Today I decided to make some homemade pizza, and it was amazing. I used a recipe for the crust I found online. It is a whole wheat recipe. I decided to make a BBQ, chicken, bellpepper, pineapple pizza. It was probably the best I have ever had. The crust was super good, and really easy to make. In fact, I am going to give you all the crust recipe, and encourage all those pizza lovers out there to try it out! Here is what our pizza turned out to look like!


As you can tell by the picture, we devoured it, so I hurried and got a picture of it before it was all gone! Yummy Yummy Yummy!!
Ingredients
- 1 teaspoon white sugar
- 1 1/2 cups warm water (110 degrees F/45 degrees C)
- 1 tablespoon active dry yeast
- 1 tablespoon olive oil
- 1 teaspoon salt
- 2 cups whole wheat flour
- 1 1/2 cups all-purpose flour
Directions
- In a large bowl, dissolve sugar in warm water. Sprinkle yeast over the top, and let stand for about 10 minutes, until foamy.
- Stir the olive oil and salt into the yeast mixture, then mix in the whole wheat flour and 1 cup of the all-purpose flour until dough starts to come together. Tip dough out onto a surface floured with the remaining all-purpose flour, and knead until all of the flour has been absorbed, and the ball of dough becomes smooth, about 10 minutes. Place dough in an oiled bowl, and turn to coat the surface. Cover loosely with a towel, and let stand in a warm place until doubled in size, about 1 hour.
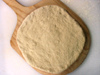
- When the dough is doubled, tip the dough out onto a lightly floured surface, and divide into 2 pieces for 2 thin crust, or leave whole to make one thick crust. Form into a tight ball. Let rise for about 45 minutes, until doubled.
- Preheat the oven to 425 degrees F (220 degrees C). Roll a ball of dough with a rolling pin until it will not stretch any further. Then, drape it over both of your fists, and gently pull the edges outward, while rotating the crust. When the circle has reached the desired size, place on a well oiled pizza pan. Top pizza with your favorite toppings, such as sauce, cheese, meats, or vegetables.
- Bake for 16 to 20 minutes (depending on thickness) in the preheated oven, until the crust is crisp and golden at the edges, and cheese is melted on the top.
*Here are a few tips they recommend to make it easier. I followed the tips after step three from the above directions. I didn't have the crust rise again for 45min, I just allowed it to settle for ten minutes like they suggest in the tips below.
1. We used the recipe for Jay's Signature Pizza Crust. Once the dough has been formed and allowed to rise, uncover the dough and punch it down.
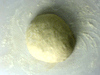
2. This particular recipe makes a two pizza crusts or one very large crust. If you would rather make individual pizza pies than one large pizza, portion the dough into as many round balls as you want pies. Once the portions have been formed, cover and let the dough sit for 5 to 10 minutes to allow the gluten to relax before rolling the dough out.
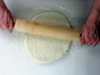
3. Flour the surface of your work area to keep the dough from sticking. While you don't need to use a rolling pin to roll the dough out, it will help maintain a consistent thickness. Another approach is to pound the dough down with your fist or palm of your hand--this is just a preliminary shaping, to form the dough ball into a disc.
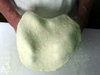
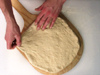
4. Dust your hands with flour to keep the dough from sticking. Gently stretch the dough using the back of your floured hands, letting the weight of the dough pull the dough thinner. Use the backs of your fingers to push the dough out wider. Start in the middle of the dough with both hands close together, and slowly pull your hands apart, allowing the dough to glide above your hands. Turn the dough about 15 degrees on your hands and repeat this step until the dough is thinner, wider, and consistent throughout the entire circumference of the crust.

5. Try spinning the dough in the air. This is certainly not required, but it's a lot of fun! It also helps to make the dough more round, as the centrifugal force causes equal amounts of pressure to be thrown out in all directions, helping the crust to form into a perfectly round shape.
6. Cover a bread peel (a rimless baking sheet or heavy square of cardboard will work well) with either flour or corn meal. This flour layer is vital because it keeps the dough from sticking to the peel, which will allow you, with a quick motion, to push the pizza off of the peel, into the hot oven, and onto a baking or pizza stone. Place the dough on the peel. Complete any final forming of the shape.
7. Arrange whatever toppings desired onto the newly formed homemade crust
I do hope you all try it out, and love it as much as Denton and I did!!


oh yum! looks delicious! And your pictures of flowers are pretty too! good job!
ReplyDeleteIt looks so good! How'd you do the toppings?
ReplyDeleteWe'll definitely try the crust recipe! Ever since we moved up to a higher elevation my pizza crust and bread making skills have gone way down hill, but this looks like it would be worth trying!
ReplyDelete